添加站点
From Senfi Docs
先决条件
- 若是定制类型,需要一个具有BBL信息的三维模型
- 若是手画建模类型,需要BBL信息
- 二维平面图
请阅读此页面以熟悉与站点相关的概念。
使用手画建模而制的模型添加新站点
- 登录内容管理系统
- 转到站点标签
- 点击“+”按钮
- 填写必填字段(例如站点名称,描述,国家/地区,地址等)
- 选择手画建模类型
- 在建筑物,楼和层部分下添加BBL信息
- 重命名建筑物(可选)
- 单击建筑物名称旁边的“编辑”按钮
- 重命名建筑物
- 单击“保存”
- Edit Block (Optional)
- Click Edit button beside Block Name
- Rename Block
- Update Base Position (Optional)
- The position of the block's ground level base
- Default value is 0
- Click SAVE
- Add Levels
- You can add individual level or add multiple levels
- Add individual Level
- Click + button beside Block Name to add new level under that block
- Choose the level type
- Below Ground: basement level
- Above Ground
- Add Level name
- Add Height
- Click SAVE
- Add multiple Levels
- Click + button beside Block Name to add new levels under that block
- Choose the level type
- Below Ground: basement level
- Above Ground
- Add No.of Levels (must be greater than 1)
- Leave Level name blank (level names can be rename after added)
- Add Height (All of the levels are using the same height)
- Click SAVE
- Navigate to the building location in map (Can use search feature) under DRAW FOOTPRINT
- Click the EDIT button to enter edit mode
- Trace building outline by clicking on the map
- Click the STOP EDITING button to confirm the outline
- Click PREVIEW tab to preview the 3D building
- Click SET DEFAULT VIEW button to set the initial view in dashboard (optional)
- Add 2D floorplan for each levels
- Click floorplan icon button beside edit icon button
- Select 2D floorplan image file
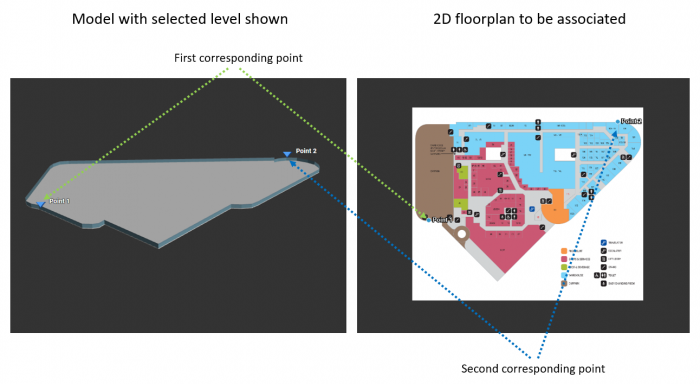
- Add 3D & 2D reference points
- Click SAVE to save the floorplan
- Click SAVE
Add New Site with Bespoke Model
- Login to the CMS
- Go to the Site tab
- Click the + button
- Fill in the necessary fields (Eg. Site Name, Description, Country, Address, etc...)
- Choose Bespoke model type
- Select 3D building model file (zip file)
- Click SET DEFAULT VIEW button to set the initial view in dashboard
- Add 2D floorplan for each levels
- Click floorplan icon button beside edit icon button
- Select 2D floorplan image file (click Choose File)
- Add 3D & 2D reference points
- Click SAVE to save the floorplan
- Click SAVE

