Difference between revisions of "V2/CMS Tutorial/Developer Tools/Debug/Data"
From Senfi Docs
Elysia.Tan (talk | contribs) (Created page with "<h1 class="main-heading">Monitor Incoming Data</h1> This section covers the following topics: ===Steps=== # Go to the 30px|link= '''Developer'''...") |
Elysia.Tan (talk | contribs) |
||
| Line 1: | Line 1: | ||
<h1 class="main-heading">Monitor Incoming Data</h1> | <h1 class="main-heading">Monitor Incoming Data</h1> | ||
| − | + | <div class="important">Note: The following steps assume that the user is already logged in to the [https://app.senfi.io/cms/ CMS]. </div> | |
===Steps=== | ===Steps=== | ||
| + | [[File:Inspect_measurements_steps.png|thumb|center|600px|Steps to monitor incoming data|link=]] | ||
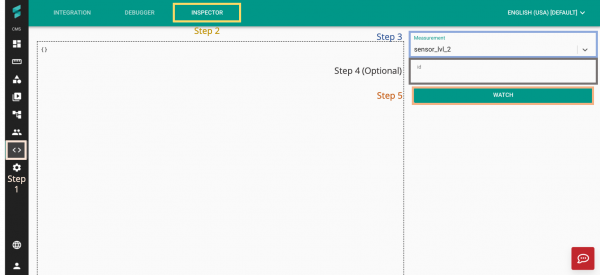
# Go to the [[File:Developer_Icon.png|30px|link=]] '''Developer''' tab and select '''INSPECTOR'''. | # Go to the [[File:Developer_Icon.png|30px|link=]] '''Developer''' tab and select '''INSPECTOR'''. | ||
# Select '''Measurement''' from the [[File:Measurement_dropdown.png|230px|link=]] '''Measurement dropdown list'''. | # Select '''Measurement''' from the [[File:Measurement_dropdown.png|230px|link=]] '''Measurement dropdown list'''. | ||
Revision as of 11:56, 29 June 2021
Monitor Incoming Data
Note: The following steps assume that the user is already logged in to the CMS.
Steps
- Go to the
 Developer tab and select INSPECTOR.
 - Select Measurement from the
 Measurement dropdown list.
- Only measurements that exist in the CMS can be monitored. See Add Measurement to learn how to add a measurement to the CMS.
- Fill in the tag value of the asset to be monitored (Optional).
- If unfilled, all assets associated with the measurement will be monitored.
- Select WATCH.

