Translations: Adding a site/4/zh-cn

From Senfi Docs
Jump to: navigation, search
 
Line 1: Line 1:
 
=== 使用定制模型添加新站点 ===
 
=== 使用定制模型添加新站点 ===
 
# 登录[https://ems.senfi.io/cms 内容管理系统]
 
# 登录[https://ems.senfi.io/cms 内容管理系统]
# 转到'''站点'''标签
+
# 转到'''站点'''选项卡
 
# 点击'''“+”'''按钮
 
# 点击'''“+”'''按钮
 
# 填写必填字段(例如站点名称,描述,国家/地区,地址等)
 
# 填写必填字段(例如站点名称,描述,国家/地区,地址等)

Latest revision as of 17:15, 25 October 2019

Information about message (contribute)
This message has no documentation. If you know where or how this message is used, you can help other translators by adding documentation to this message.
Message definition (Adding a site)
=== Add New Site with Bespoke Model ===
# Login to the [https://ems.senfi.io/cms CMS]
# Go to the '''Site''' tab
# Click the '''+''' button
# Fill in the necessary fields (Eg. Site Name, Description, Country, Address, etc...)
# Choose '''Bespoke''' model type
# Select 3D building model file (zip file)
# Click '''SET DEFAULT VIEW''' button to set the initial view in dashboard
# Add 2D floorplan for each levels
## Click floorplan icon button beside edit icon button
## Select 2D floorplan image file (click '''Choose File''')
## Add 3D & 2D reference points[[File:Calibration1.PNG|thumb|700px|center|Add 3D & 2D reference points|link=]]
## Click '''SAVE''' to save the floorplan
# Click '''SAVE'''
Translation=== 使用定制模型添加新站点 ===
# 登录[https://ems.senfi.io/cms 内容管理系统]
# 转到'''站点'''选项卡
# 点击'''“+”'''按钮
# 填写必填字段(例如站点名称,描述,国家/地区,地址等)
#选择'''定制'''模型类型 
# 选择三维建筑模型文件(zip文件)
# 单击'''“设置默认视图”'''按钮以在仪表板中设置初始视图
# 给每个楼层添加二维平面图
## 单击“编辑图标”按钮旁边的平面图图标按钮
## 选择二维平面图图像文件(点击'''选择文件''')
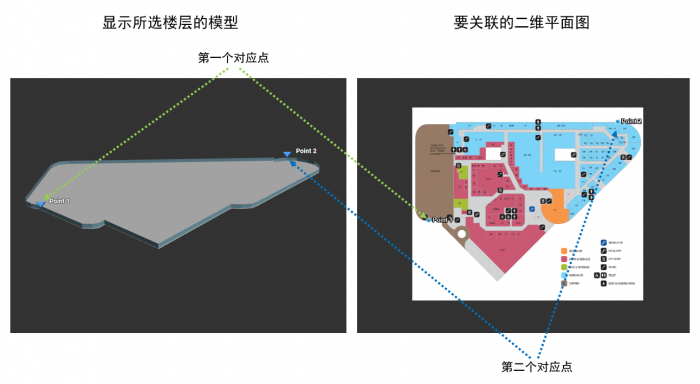
## 添加三维和二维参考点[[File:Calibration1-zh-cn.png|thumb|700px|center|添加三维和二维参考点|link=]]
## 单击'''“保存”'''以保存平面图
# 单击'''“保存”'''

使用定制模型添加新站点

  1. 登录内容管理系统
  2. 转到站点选项卡
  3. 点击“+”按钮
  4. 填写必填字段(例如站点名称,描述,国家/地区,地址等)
  5. 选择定制模型类型
  6. 选择三维建筑模型文件(zip文件)
  7. 单击“设置默认视图”按钮以在仪表板中设置初始视图
  8. 给每个楼层添加二维平面图
    1. 单击“编辑图标”按钮旁边的平面图图标按钮
    2. 选择二维平面图图像文件(点击选择文件
    3. 添加三维和二维参考点
      添加三维和二维参考点
    4. 单击“保存”以保存平面图
  9. 单击“保存”