|
|
| Line 28: |
Line 28: |
| | ### 单击'''“保存”''' | | ### 单击'''“保存”''' |
| | ##* 添加多个楼层 | | ##* 添加多个楼层 |
| − | ### Click '''+''' button beside '''Block Name''' to add new levels under that block | + | ### 单击'''大楼名称'''旁边的'''“+”'''按钮以在该大楼下添加楼层 |
| − | ### Choose the level type | + | ### 选择楼层类型 |
| − | ###* Below Ground: basement level | + | ###* 低于地面:地下室 |
| − | ###* Above Ground | + | ###* 高于地面 |
| − | ### Add No.of Levels (must be greater than 1) | + | ### 添加楼层次数(必须多过1) |
| − | ### Leave Level name blank (level names can be rename after added) | + | ### 将楼层名称保留为空白(楼层被添加后可以重命名楼层名称) |
| − | ### Add Height (All of the levels are using the same height) | + | ### 添加高度(所有楼层都使用相同的高度) |
| − | ### Click '''SAVE''' | + | ### 单击'''“保存”''' |
| − | # Navigate to the building location in map (Can use search feature) under '''DRAW FOOTPRINT''' | + | # 导航到'''勾画建筑轨迹'''下的地图中的建筑物位置 |
| − | # Click the '''EDIT''' button to enter edit mode | + | # 单击'''“编辑”'''按钮进入编辑模式 |
| − | # Trace building outline by clicking on the map | + | # 通过单击地图来跟踪建筑物轮廓 |
| − | # Click the '''STOP EDITING''' button to confirm the outline | + | # 单击'''“停止编辑”'''按钮以确认轮廓 |
| − | # Click '''PREVIEW''' tab to preview the 3D building | + | # 单击'''“预览”'''标签以预览三维模型 |
| − | # Click '''SET DEFAULT VIEW''' button to set the initial view in dashboard (optional) | + | # 单击'''“设置默认视图”'''按钮以在仪表板中设置初始视图(可选)Click ''' |
| − | # Add 2D floorplan for each levels | + | # 给每个楼层添加二维平面图 |
| − | ## Click floorplan icon button beside edit icon button | + | ## 单击“编辑图标”按钮旁边的平面图图标按钮 |
| − | ## Select 2D floorplan image file | + | ## 选择二维平面图图像文件 |
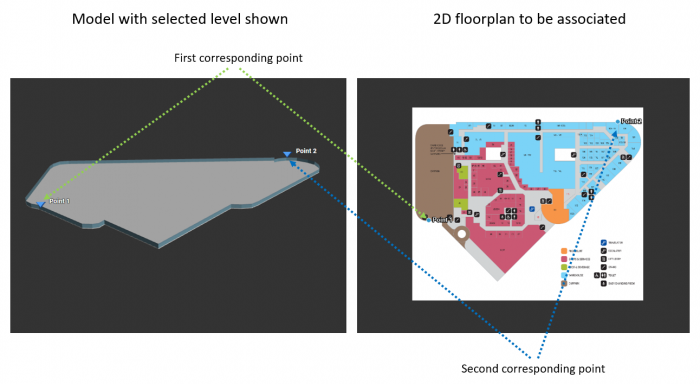
| − | ## Add 3D & 2D reference points[[File:Calibration1.PNG|thumb|700px|center|Add 3D & 2D reference points|link=]] | + | ## 添加三维和二维参考点[[File:Calibration1.PNG|thumb|700px|center|添加三维和二维参考点|link=]] |
| − | ## Click '''SAVE''' to save the floorplan | + | ## 单击'''“保存”'''以保存平面图 |
| − | # Click '''SAVE''' | + | # 单击'''“保存”''' |

