Difference between revisions of "V2/CMS Tutorial/User Tools/Creating Content/Export/CSV"
From Senfi Docs
(Created page with "<h1 class="main-heading">Exporting Senfi Data to CSV</h1> Assets in Senfi can be exported into CSV for backup. When exporting, only asset related information will be exported...") |
|||
| Line 14: | Line 14: | ||
# Select the "Site" which to be exported. | # Select the "Site" which to be exported. | ||
# Click "EXPORT" [[File:Brick_Export_Steps6.png|thumb|center|700px|Steps 6 export Senfi assets into CSV|link=]] | # Click "EXPORT" [[File:Brick_Export_Steps6.png|thumb|center|700px|Steps 6 export Senfi assets into CSV|link=]] | ||
| − | # Once export is completed, click on "Download" to download the . | + | # Once export is completed, click on "Download" to download the .csv file. |
Latest revision as of 00:08, 20 November 2021
Exporting Senfi Data to CSV
Assets in Senfi can be exported into CSV for backup. When exporting, only asset related information will be exported:
- General information (Site, Icon, Name, Description, Location etc.)
- Attributes information
- Source information (Measurement, Event, Stream, iFrame)
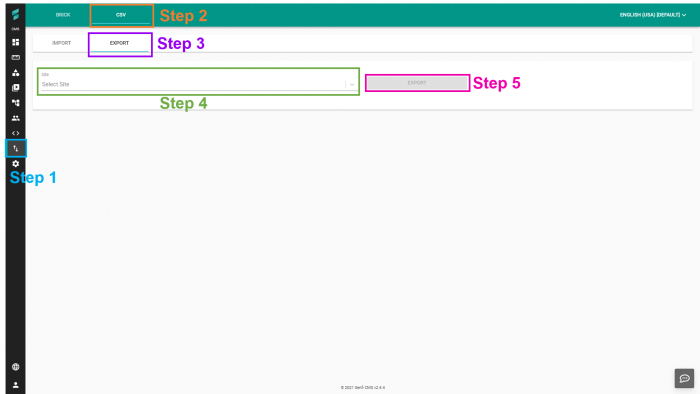
How to Export Senfi Asset into CSV
- Go to "Import" tab
- Select "CSV"
- Select "EXPORT" tab
- Select the "Site" which to be exported.
- Click "EXPORT"
- Once export is completed, click on "Download" to download the .csv file.


