Difference between revisions of "V2/CMS Tutorial/User Tools/Creating Content/Import/CSV"
| Line 50: | Line 50: | ||
===== Lift related Columns ===== | ===== Lift related Columns ===== | ||
If there are Lift assets, the following headers must exist to provide lift related information. | If there are Lift assets, the following headers must exist to provide lift related information. | ||
| − | * | + | * Stops |
** a comma separated list of "Level ID"s that the lift stops at, enclosed in square brackets [ ]. | ** a comma separated list of "Level ID"s that the lift stops at, enclosed in square brackets [ ]. | ||
** E.g: [1b0dd17a-2785-4771-88ce-7158e7081d05,68caa9f0-32ed-44d1-94cc-9ddc768314d8] | ** E.g: [1b0dd17a-2785-4771-88ce-7158e7081d05,68caa9f0-32ed-44d1-94cc-9ddc768314d8] | ||
Revision as of 15:03, 23 September 2021
Contents
Importing CSV
Senfi allows you to create Assets by importing necessary information from a CSV file. The following section will detail the process to do so, and the specifications of the CSV file.
Prerequisite knowledge:
- Senfi concepts related to Asset
- Senfi concepts related to Lift & Movable Asset
- Building, Block & Level concepts
- Measurement concepts, and corresponding Tag system.
- External event sources, and corresponding Tag system.
How to Import CSV
TODO: add step by step screenshots
CSV File Specifications
The supported CSV format is RFC 4180, UTF-8. Saving as CSV from Excel should be compatible for most Excel versions. For the purposes of this guide, we will be using Excel as the CSV editor.
The imported CSV is split into 2 parts.
- Header
- Rows
The first row of the CSV file is the header row. The header row identifies the data contained within each column. The value of the header cell tells Senfi what to do with the column's data. For example, a column with header "Name" tells Senfi to assign the value of that column to the Name of each Asset.
The value of each header cell must equal to senfi-defined values, or conform to senfi-defined format, which will be outlined in the Headers section below. Any columns with non-conforming headers will be ignored.

Each subsequent row (2nd row onwards) in the CSV file is an Asset to be imported.
Headers
Required Columns
The following headers must be in every imported CSV file, with valid values provided for each row. They are required to create an Asset.
- Name
- Is Virtual
- Site ID
Optional Columns
The following headers are optional. They provide more information about the Assets to be imported.
- Description
- Location X
- Location Y
- Location Z
- Building ID
- Block ID
- Level ID
- Is Movable
- Is Lift
Lift related Columns
If there are Lift assets, the following headers must exist to provide lift related information.
- Stops
- a comma separated list of "Level ID"s that the lift stops at, enclosed in square brackets [ ].
- E.g: [1b0dd17a-2785-4771-88ce-7158e7081d05,68caa9f0-32ed-44d1-94cc-9ddc768314d8]
Attribute Columns
To import Attribute information, add a header for each attribute, using the following format:
- [Attribute] <attribute_name>
If an Asset does not have an attribute, leave the column blank for that row.
Measurement Columns
To import measurement's tag information, add a header for each measurement's tag_field with the following format:
- [Measurement] <measurement_code>.<tag_field>
If an Asset does not have the measurement, leave the column blank for that row.
Event Columns
To import event's tag information, add a header for each event's tag_field with the following format:
- [Event] <event_def_id>.<tag_field>
If an Asset does not have the event, leave the column blank for that row.
Stream Columns
To add Video Streams to imported Asset, add the following header.
- Stream
The header can appear multiple times in the header row, as many as is required.
Iframe Columns
To add Iframe to imported Asset, add the following header.
- Iframe
The header can appear multiple times in the header row, as many as is required.
How to obtain relevant IDs
Site ID
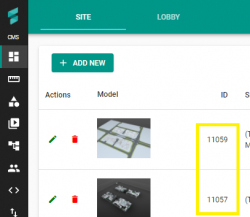
Site ID can be obtained from CMS -> Site Page -> Site tab as shown below.

Building, Block, Level ID
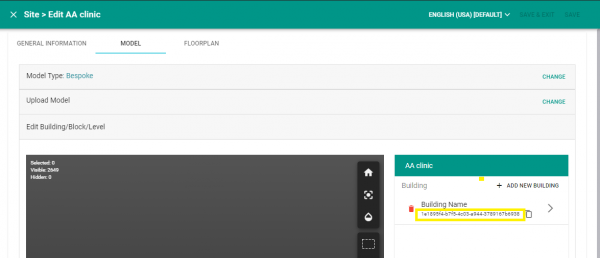
Building, Block and Level ID can be obtained in CMS -> Site page -> edit Site -> Model tab -> Edit Building/Block/Level
Navigate to the Building, Block or Level you wish to obtain the ID of. The Building ID, Block ID and Level ID is displayed below its name, as shown below.

Stream ID
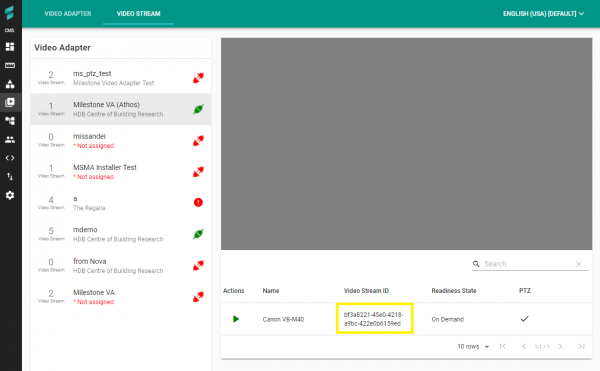
Video Stream ID can be obtained in CMS -> Video page -> Video Stream tab
Select the Video Adapter hosting the Video Stream. The Video Stream ID will be displayed as shown below

Event Def ID
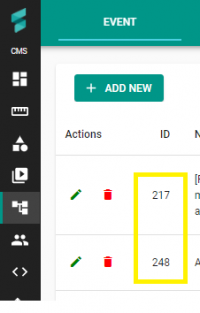
Event Def ID can be obtained from CMS -> Automation Page -> Event tab as shown below.

