Difference between revisions of "V2/CMS Tutorial/User Tools/Creating Content/Automation/Event/Action/Webhook"
From Senfi Docs
Elysia.Tan (talk | contribs) |
m (Added the last statement to make clear more than one webhook is possible.) |
||
| (2 intermediate revisions by one other user not shown) | |||
| Line 4: | Line 4: | ||
===Steps=== | ===Steps=== | ||
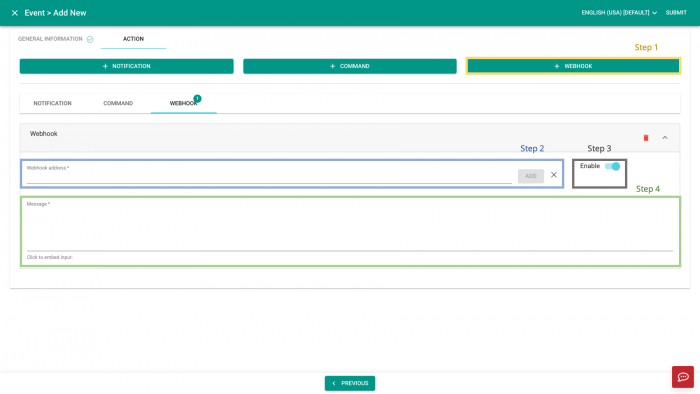
| + | [[File:Add_webhook_steps.png|thumb|center|700px|Steps to add Webhook as Event Action|link=]] | ||
# Select [[File:Add_webhook.png|220px|link=]] '''Add Webhook'''. | # Select [[File:Add_webhook.png|220px|link=]] '''Add Webhook'''. | ||
# Fill in webhook address. | # Fill in webhook address. | ||
# Choose to [[File:enable.png|80px|link=]] '''enable''' or [[File:disable.png|80px|link=]] disable''' the webhook. | # Choose to [[File:enable.png|80px|link=]] '''enable''' or [[File:disable.png|80px|link=]] disable''' the webhook. | ||
# Fill in webhook message: | # Fill in webhook message: | ||
| − | #* You can [[V2/CMS_Tutorial/User_Tools/Creating_Content/Automation/Event/Inputs| | + | #* You can embed user-defined [[V2/CMS_Tutorial/User_Tools/Creating_Content/Automation/Event/Inputs|inputs]]. |
| + | |||
| + | <div class="important">Tip: Repeat the above to add another Webhook. </div> | ||
Latest revision as of 10:11, 31 March 2022
Send Webhook
Note: Mandatory fields are marked with an ‘*’.
Steps
- Select
 Add Webhook.
 - Fill in webhook address.
- Choose to
 enable or
  disable the webhook.
- Fill in webhook message:
- You can embed user-defined inputs.
Tip: Repeat the above to add another Webhook.

