
Difference between revisions of "V2/CMS Tutorial/User Tools/Creating Content/Automation/Event/Action/Command"
From Senfi Docs
Elysia.Tan (talk | contribs) (Created page with "<h1 class="main-heading">Send Command</h1>") |
m (Added the last statement to make clear more than one command is possible.) |
||
| (5 intermediate revisions by one other user not shown) | |||
| Line 1: | Line 1: | ||
<h1 class="main-heading">Send Command</h1> | <h1 class="main-heading">Send Command</h1> | ||
| + | |||
| + | <div class="important">Note: Mandatory fields are marked with an ‘*’.</div> | ||
| + | |||
| + | ===Steps=== | ||
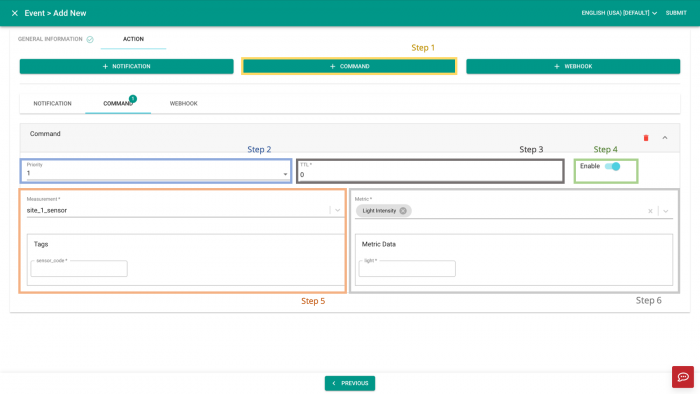
| + | [[File:Add_command_steps.png|thumb|center|700px|Steps to add Command as Event Action|link=]] | ||
| + | # Select [[File:Add_command.png|210px|link=]] '''Add Command'''. | ||
| + | # Set the '''Priority''' of the command (Lowest: 1 - Highest: 9). | ||
| + | # Set command's '''time to live (TTL)'''. | ||
| + | # Choose to [[File:enable.png|80px|link=]] '''enable''' or [[File:disable.png|80px|link=]] disable''' the command. | ||
| + | # Select a "Measurement" from the Measurement dropdown list and fill in the "Required Tags". | ||
| + | #* Only measurements with '''movable''' metrics can be selected. | ||
| + | # Select a "Metric" from the Metric dropdown list and fill in the "Metric Data". | ||
| + | |||
| + | <div class="important">Tip: Repeat the above to add another Command. </div> | ||
Latest revision as of 10:10, 31 March 2022
Send Command
Note: Mandatory fields are marked with an ‘*’.
Steps
- Select
 Add Command.
 - Set the Priority of the command (Lowest: 1 - Highest: 9).
- Set command's time to live (TTL).
- Choose to
 enable or
  disable the command.
- Select a "Measurement" from the Measurement dropdown list and fill in the "Required Tags".
- Only measurements with movable metrics can be selected.
- Select a "Metric" from the Metric dropdown list and fill in the "Metric Data".
Tip: Repeat the above to add another Command.